Find automation scripts, troubleshooting steps, and best practices for running workloads in Microsoft Azure.
This is the multi-page printable view of this section. Click here to print.
Azure
Guides and utilities tailored for Azure workloads.
1 - Virtual Machines
Scripts and references for managing Azure virtual machines.
Use these notes to inspect, configure, and automate your Azure VM fleet.
1.1 - Profile Fetcher for Linux Azure VM
Collect Azure VM instance metadata in a single, readable summary.
GitHub Repository: https://github.com/samatild/azvmprofilefetcher
Introduction
Managing Azure Virtual Machines (VMs) can be complex, especially when dealing with multiple instances and ensuring they are configured correctly. The Profile Fetcher for Azure VM is a script designed to simplify the process of retrieving and displaying detailed metadata about your Azure VMs. This article explains how to use the script and how it can make the task of checking Azure VM profiles easier.
Features
- Fetch Metadata: Retrieves metadata directly from the Azure Instance Metadata Service.
- Simple Summary: Organizes and displays metadata in a structured format with clear section headers.
Requirements
- Python 3: The script is written in Python 3 and requires Python to be installed on the system.
How to Use
To use the Profile Fetcher for Azure VM, you need to run the script on your Azure VM. The easiest way to execute the script is by using curl to download and pipe it directly to python3. Here is the command:
curl -s https://raw.githubusercontent.com/samatild/azvmprofilefetcher/main/azurevmprofile.py | python3
This command downloads the script from the GitHub repository and runs it using Python 3. The script will then fetch the metadata from the Azure Instance Metadata Service and display it in a structured format.
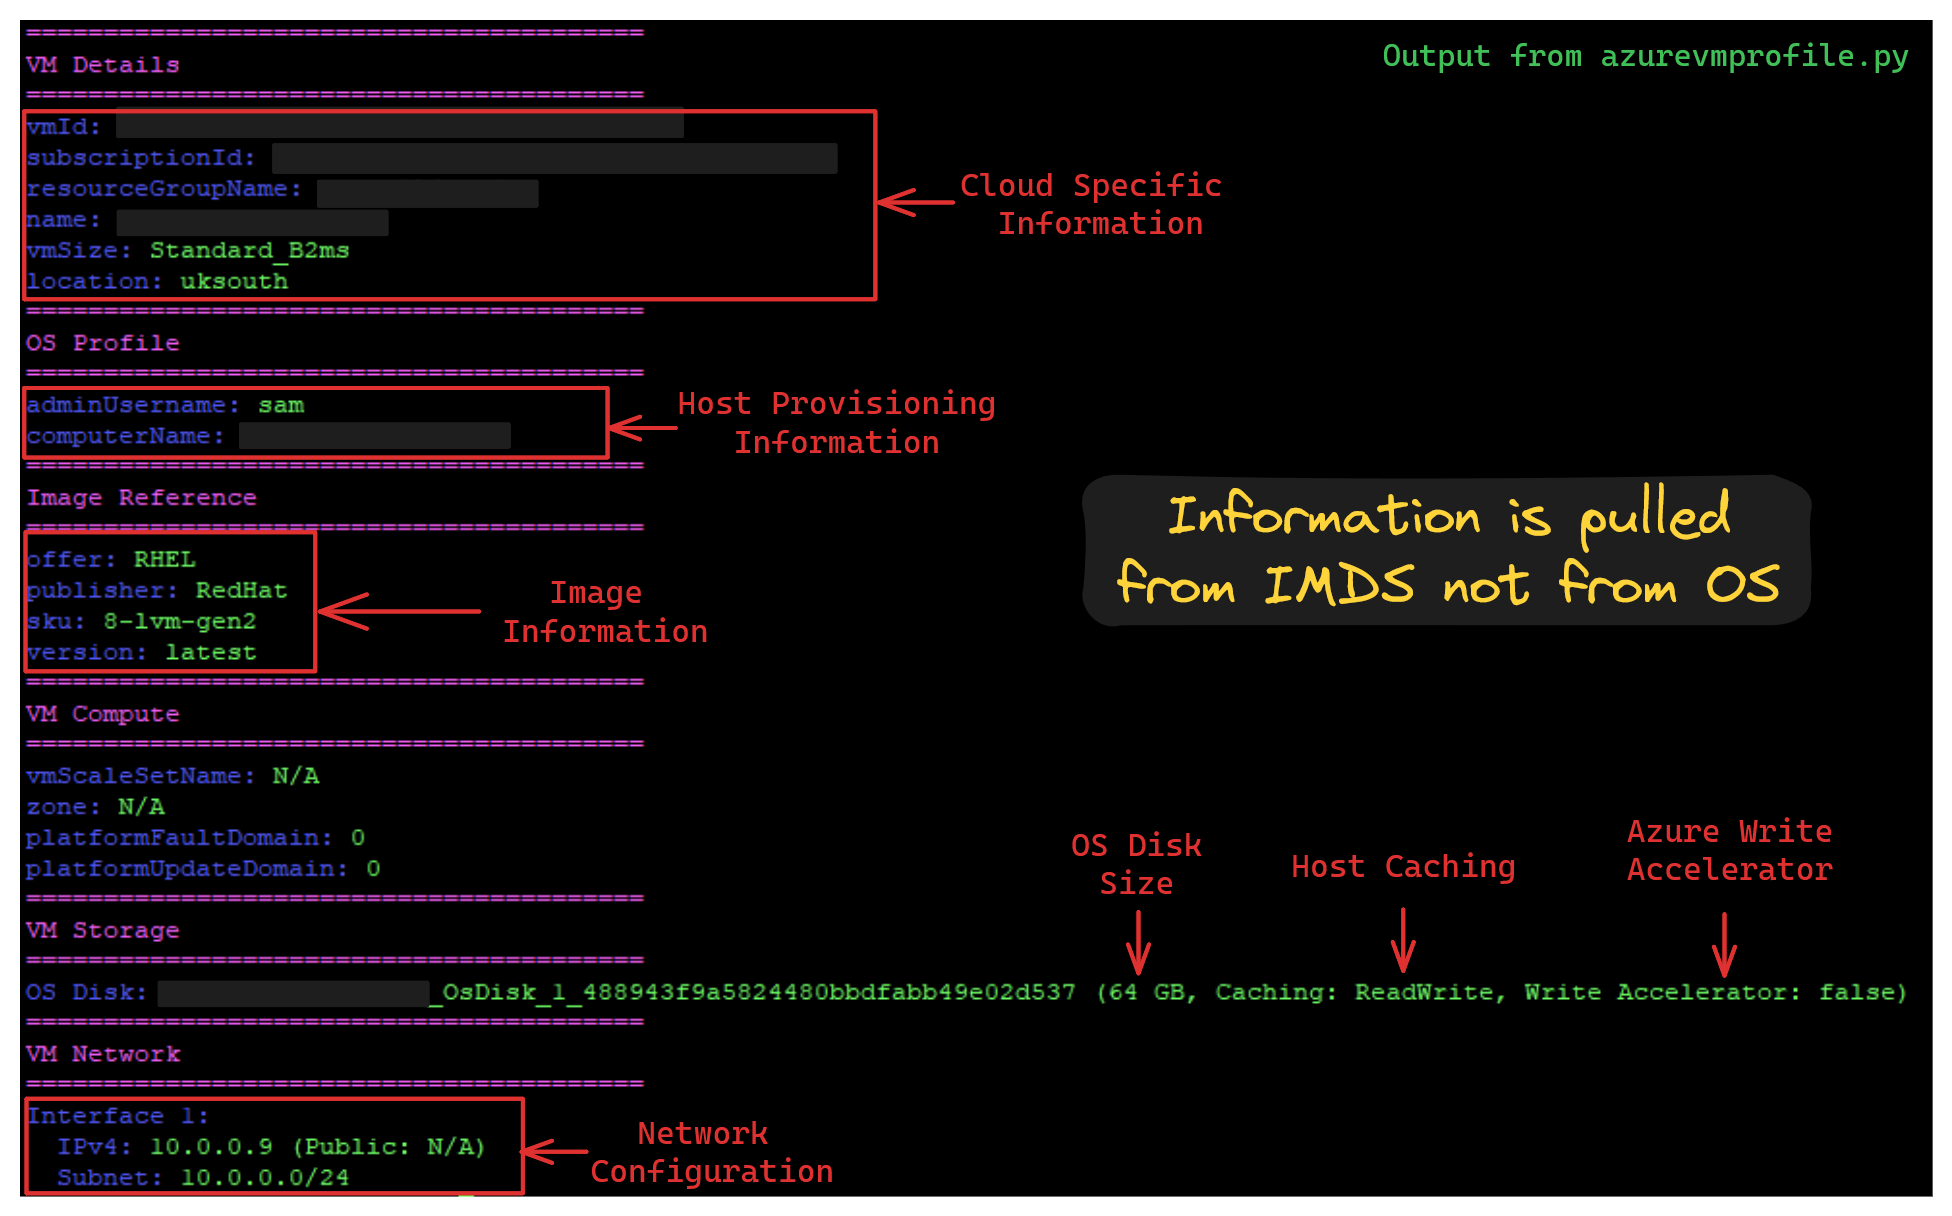
Example Output
Conclusion
The Profile Fetcher for Azure VM script provides a straightforward and effective way to retrieve and display detailed information about your Azure VMs. By using this script, administrators and developers can quickly access important VM metadata, making it easier to manage and troubleshoot their Azure environments.
For more details and to access the script, visit the GitHub Repository:.
1.2 - Enable Azure Serial Console and GRUB Menu on Linux VMs
Configure GRUB and systemd to expose the GRUB menu and kernel logs over Azure Serial Console on Linux VMs, including migrated images.
Azure Serial Console is invaluable when SSH or the network is unavailable. This guide shows how to configure Linux distributions to expose the GRUB menu and kernel boot logs over the VM’s serial port on Azure, fixing cases where migrated images or some distros don’t show GRUB or any serial output.
For proactive setup, follow Microsoft’s official guide: Proactive GRUB and serial console configuration for Linux on Azure. This article is intended for cases where you’re facing issues getting serial console and the GRUB menu to display and need troubleshooting-oriented configuration.
What you’ll do
- Enable GRUB output/input over serial
- Ensure kernel logs go to serial early in boot
- Enable a login prompt on
ttyS0 - Regenerate GRUB config per distro
Prerequisites
- VM is running in Azure
- You have admin/root access inside the VM
- In the Azure portal, ensure Serial Console access is permitted for your subscription/VM and that you have sufficient RBAC permissions
1) Edit /etc/default/grub
Back up the current file:
sudo cp -a /etc/default/grub /etc/default/grub.bak.$(date +%Y%m%d-%H%M%S)
Replace or add the following settings. The kernel command line can vary slightly by distro (see next section), but the following is a solid baseline for Azure VMs:
GRUB_TIMEOUT=10
GRUB_DISTRIBUTOR="$(sed 's, release .*$,,g' /etc/system-release)"
GRUB_DEFAULT=saved
GRUB_DISABLE_SUBMENU=true
GRUB_CMDLINE_LINUX="crashkernel=auto console=tty1 console=ttyS0 earlyprintk=ttyS0 rootdelay=300"
GRUB_DISABLE_RECOVERY="true"
GRUB_ENABLE_BLSCFG=true
GRUB_TIMEOUT_STYLE=menu
GRUB_TERMINAL="serial console"
GRUB_SERIAL_COMMAND="serial --speed=115200 --unit=0 --word=8 --parity=no --stop=1"
GRUB_TERMINAL_OUTPUT="serial console"
GRUB_TERMINAL_INPUT="serial console"
Notes:
- The last
GRUB_TERMINAL_*andGRUB_TERMINALlines ensure both serial and local console are active; Azure usesttyS0by default. console=parameters are processed in order; the last one becomes the primary console for messages. Keepingconsole=ttyS0last prioritizes Azure Serial Console output.earlyprintk=ttyS0helps very early boot logs appear; some newer kernels useearlyconinstead (optional).
2) Distro-specific kernel cmdline and GRUB regeneration
After updating /etc/default/grub, regenerate GRUB with the appropriate command for your distro and firmware type.
Ubuntu/Debian
- Prefer to include serial console in both lines:
GRUB_CMDLINE_LINUX="crashkernel=auto console=tty1 console=ttyS0,115200n8 rootdelay=300"
GRUB_CMDLINE_LINUX_DEFAULT="console=tty1 console=ttyS0,115200n8"
Regenerate GRUB:
sudo update-grub
RHEL, CentOS, AlmaLinux, Rocky Linux, Fedora
- Keep
GRUB_ENABLE_BLSCFG=trueon BLS-based distros (RHEL8+/Fedora). EnsureGRUB_CMDLINE_LINUXincludes serial console:
GRUB_CMDLINE_LINUX="crashkernel=auto console=tty1 console=ttyS0,115200n8 rootdelay=300"
Regenerate GRUB (choose the correct target for your firmware):
# BIOS
sudo grub2-mkconfig -o /boot/grub2/grub.cfg

# UEFI (RHEL/Alma/Rocky)
sudo grub2-mkconfig -o /boot/efi/EFI/redhat/grub.cfg

# UEFI (Fedora)
sudo grub2-mkconfig -o /boot/efi/EFI/fedora/grub.cfg
SUSE (SLES, openSUSE)
GRUB_CMDLINE_LINUX="crashkernel=auto console=tty1 console=ttyS0,115200n8 rootdelay=300"
Regenerate GRUB (choose the correct target for your firmware):
# BIOS
sudo grub2-mkconfig -o /boot/grub2/grub.cfg

# UEFI (SUSE)
sudo grub2-mkconfig -o /boot/efi/EFI/opensuse/grub.cfg
3) Enable a serial login on ttyS0
Most Azure images already spawn a getty on ttyS0, but some migrated images do not. Ensure it is enabled:
sudo systemctl enable --now [email protected]
Verify:
systemctl status [email protected]
4) Reboot and test
sudo reboot
In the Azure portal, open the VM and select Serial console. You should see the GRUB menu and kernel boot logs over serial. Use the arrow keys to select entries if needed.
Verification checklist
- Kernel cmdline contains serial console:
cat /proc/cmdline
# expect ... console=tty1 console=ttyS0,115200n8 ...
- Serial device is present and initialized:
dmesg | grep -Ei "(ttyS0|console)"
- GRUB environment saved entry (optional):
sudo grub2-editenv list 2>/dev/null || true
Troubleshooting
No GRUB menu over serial
- Ensure
GRUB_TIMEOUT_STYLE=menuandGRUB_TIMEOUT>0 - Ensure
GRUB_TERMINAL="serial console"andGRUB_SERIAL_COMMANDare set - Regenerate GRUB for the correct firmware path (BIOS vs UEFI)
- Ensure
No kernel logs over serial
- Ensure
console=ttyS0,115200n8appears in the kernel cmdline and is last - Consider adding
earlyconon very new kernels ifearlyprintkis ignored
- Ensure
No login prompt in Serial Console
- Enable
[email protected] - Check
journalctl -u [email protected] -b
- Enable
Migrated image still not working
- Double-check
/etc/default/grubmatches the settings above - Reinstall/refresh the bootloader if necessary (distro-specific)
- Verify the correct GRUB config path was regenerated
- Double-check
References
- Azure Serial Console for Linux (Microsoft Learn): https://learn.microsoft.com/en-us/troubleshoot/azure/virtual-machines/linux/serial-console-linux